Tel/Fax: +39 055.828315 [email protected] / Facebook


The latest news from the Joomla! Team


 Argon18 is probably the biggest news in triathlon at the moment. Known as the 'other' Canadian bike company, they did not really expect a bike from them right now, but their timing could not be better. The E119 is the only major bike to be released in 2015 (other than the LOOK 796 Monoblade). We've got a good, detailed look at the bike in Las Vegas, and our initial impression is that Argon18 has put together an excellent platform that is sure to be very popular in the coming season.

Despite the relative maturity of three bike designs, brakes continue to be a sore spot for many athletes, and a headache for many bike manufacturers. Many brands simply slap on a cheap OEM product, despite the problems associated with their use. But a few brands have taken the considerable time and effort required to make a truly good integrated brake. I'm talking about Trek, Felt, Cervelo (though I'm mixed on the Maguras), and now Argon18 joins that exclusive club.

For me, the front end of the bike is often the differentiating factor between a great bike and a mediocre one. And apart from brakes, that really means the bars and stem. Again, the E119 shines here. Without a closer look at the bars and actually installing one myself, I can not say for sure how the wrenching goes. But the bars look fairly simple to install and adjust. They are flippable, to provide a bit of stack height adjustment. The bikes in this picture had them in the standard "down" position, but they could be flipped to provide rise instead. That's the only adjustment you can make to the base bars, as there is no other stem or bar option available. Base bar height is not usually considered the top metric for three bike fit, so the lack of bar adjustment will not matter for most riders. But if you know that you're particularly sensitive to base bar stack, you'll want to research the E119 fit before taking the plunge here.

Beyond those key elements, the bike is pretty straight down the middle. No gimmicky tube shapes, very good closure of the space envelopes between downtube / wheel / fork, vertical dropouts (yay!), Wedge-style seat binder, and liberal use of truncated airfoils. Curiously, although the E119 uses the excellent Ritchey SideBinder style clamp, that clamp does not slide along a 10mm round rail as well as other posts. This means that it is not compatible with the 10mm round accessories from XLAB and others. Instead, Ritchey created a high hexagonal shape that they used to attach their own bottle carrier / storage unit. But that unit (and that seat post) just come with the E119 +. The standard E119 gets neither the carrier nor the hexagonal bore. Strange.

Here's an area close to my heart. I'm very, very happy to see Argon18 abandon the TRP V-brake in favor of the far superior centerpull design. So far Felt, Trek, and now Argon18 have all developed their own excellent centerpull designs. I love this trend, even if it means I'll sell fewer brakes.


From the tip of the aerobars to the back of the rear dropouts, Argon18 did an excellent job designing this bike. Here's a look at the details.


 The importance of technology
The goal of the other is to help runners avoid injury by teaching a racing technique effective and low impact. Just like in other sports, we must listen to the experts to get the most. Whether you are a beginner or high level racers, our "Learn To Run" initiative helps runners to run better and healthier.

The aim of the initiative "Learn To Run" is a race proven runners to teach effectively and safely to avoid injury and run faster with less effort. Once mastered, proper technique allows you to run more effectively, less fatigue and less risk of injury.
If praticaste any other sport would you take lessons? Just as the movement than any other sport, also may be effective and ineffective. Other points to match the start of classes of racing technique throughout the country with the launch of our shoes, to help walkers to learn to run so easier, faster and with less risk of injury. Even if we were born to run, our body must be in good shape to be truly efficient.
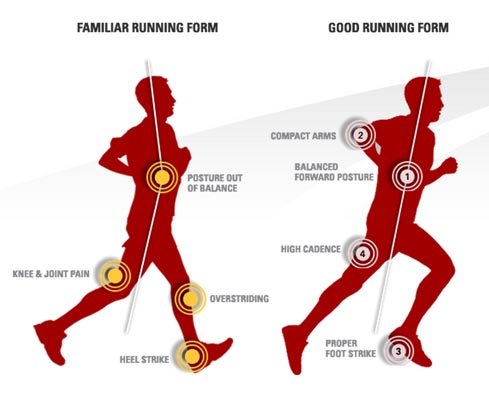
During running, the body should be upright, balanced and protrude forward of ankles. The deep muscles are responsible to keep good posture and your back straight. The chest must push forward slightly and your arms should push back while the hips and knees extends.
Your hands should remain close to your chest, making a short swing and contained. Push back the arms and relax them by taking them forward. To help your legs to push in a straight line and the foot to rest in line with the knee bent, your arms should move back and forth swinging sideways as little as possible, while the elbows must not ever arriving in front of the trunk, unless you run a very sustained speed. The trunk must allow the foot to rise quickly and extend behind the Centre of gravity of the body. Your feet should rest on the ground in line with your knees bent, while the leg starts moving back below the body. Even if the foot rests on the ground slightly advanced position compared to its body, you will have the feeling that it is directly below it. Many people support the entire surface of the foot on the ground at the same time (midfoot). However, depending on the genetic characteristics, the type of shoes worn and the surface on which it runs, it may be a slight forefoot support or a lightweight heel support.
The support of the foot should be light and fast, at a rate of about 180 steps per minute. Running barefoot can help a lot to understand and master the proper technique for the ride.
Take at least 1/3 of the distance on natural or irregular surfaces, such as grass, gravel or cobblestone: This helps you balance your muscle structure and strengthen the stabilizing muscles.
Many sporting goods stores are keeping travel lessons right now: contact your nearest store! If you don't do this, esortalo to begin with. There are many valid methods to learn proper technique, here are a few:
Other calls on all runners to do at least a bit of barefoot running. In addition to learning proper technique and strengthen your feet, running barefoot also brings many other benefits. There has never happened to run barefoot so far?
You can see and buy all models of running shoes the OTHER by clicking here
 TIPS FOR CHOOSING A HELMET FROM SCI/SNOWBOARD
You like skiing at full speed, pull the curves to the Max, tossed in the Woods and use the trees as if they were a race stakes, do jumps and acrobatics in the snow park? Very well.
Whether you are a skier oldschool, whether you're a rider or a freerider is definitely happen to make a close encounter with a rock, a tree, a plate of ice, another skier or why not, with a good skier. No doubt the helmet is what you need. The helmet is lightweight, warm and more than anything else, it can save your life. Don't think about it too much and get one for next season.
Here are some tips to help you in choosing your helmet
1. How a helmet?
A ski helmet is designed to protect you against the obstacles you may encounter in the mountains: rocks, other skier, trees, ice or catastrophic falls. In addition a ski helmet that features climbing helmets or did not skate: ear protection, adjustable ventilation, protection from cold and compatibility with a ski mask.
✓ a helmet is generally composed of two layers
The outer layer consists of a hard surface that will protect your head against impact and sharp objects. The outer shell will propagate the shock over a large surface of the helmet, by reducing the risks.
The inner layer is generally made up of expanded polystyrene. Its aim is to absorb the impact and this helps avoid injuries. Inner layer acts like a mousse that you compress by absorbing the shock, leaving your head intact.
✓ fabrication technology
The technology of IN-Mold construction allows to merge, way, the inside with the outside. In this way, the helmet will be formed from a single piece. The advantage is that this technology brings lightness to your helmet, creates a more efficient ventilation and allows you to better absorb the impact in the event of a collision.
With the Classic fusion instead the helmet consists of two pieces, the exterior and Interior. The helmet exterior is made of hard plastic, while the inner polystyrene. The two parts are glued together. This technique is less expensive but the helmet is heavier and is harder to get an adjustable ventilation.
2. HOW to CHOOSE a helmet?
Find the right size: you have to measure the circumference of your head; for this operation you need to bring a sewing and meter you need to place it above the ears and above the eyebrows. So you get a circumference ranging from 52 to 65 cm. Once you have this information use it to choose a helmet that fits your size.
Several criteria influence the choice of a helmet.
Weight: if you choose a lightweight helmet, you have the tendency to forget you have worn and your movements will not be penalized by the weight.
Ventilation: adequate ventilation will allow you to adjust the temperature and let out sweat. It is preferable for this choose helmets that have adjustable ventilation and allowing you to change the air flow while you're skiing.
Hygiene: many helmets have the internal protection and removable linings and thus washable.
Audio: some helmets have built-in audio headphones or have the ability to integrate your headphones.
Bearings and covers: certain models are sold with removable pads to adjust the helmet to fit the shape of your head. These inserts can be removed and cleaned, particularly should not be underestimated given the State in which they will be after a day of skiing.
 Stretching it or stretching?
Gli anni ' 80 were undoubtedly the period in which the validity of stretching to supplement training in sport in General and in the running in particular, reached its maximum splendour. They passed by the practice of ballistic stretching, which was based in the execution of a number of bounces, the use of static stretching. Was the book of Bob Anderson, released in 1982 to start this revolution in the understanding and practice thetendon and muscle stretching. Always attentive to the news from the training methodology, I began to practice the new method of stretching first on myself and then on my runners. Practicing stretching slowly became a way of socializing at the end of training. The hold the position for 30 "/40" gave no doubt relief. They spent a number of years and in the meantime I began to be less and less convinced of its effectiveness. Between 1999 and 2000 I advised my students to stop making stretching to see what would happen. Were amazed at the change in my attitude, but I followed him. I didn't notice any major difference between DOS and Don'ts stretching.
In recent years, specialized magazines and books have appeared in publications that have conflicting ideas about how to use the stretching in athletes. The crisis that struck me at the beginning of the year 2000, apparently, struck others as well. Some authors write just that stretching is bad. Authoritative scientific research (g. Alberti-L. Onagaro 2009) demonstrate that stretching of the calf and quadriceps can be negative before the power sports that require fast executions and large applications. You're a runner, although go strong, speed and strength that you express in your running is not very high so the problem doesn't concern you. Other concerns have emerged about the static nature of stretching that would seem to do then fine muscles especially if performed without heating. My crisis was generated by the opportunity to do some stretching in static form. When I did it I had the same pains of when, as a child, my coach made me do the ballistic stretching and my uncle Clyde that I know pain. I was very perplexed about whether debauchery did well. It's true, Bob Anderson in his book spoke of tension development easy and tension, but did not speak of pain. At the height of my crisis I met Jim and Phil Wharton, father and son physical therapists in New York specialize in running. It was the beginning of the end of my crisis.
In the following lines illustrate what, in my experience, is the proper way to do stretching.
What is stretching? Literally translated from English means "stretching". Is the practice of a number of useful exercises to improve flexibility and joint mobility. They are therefore said to a muscle is flexible when she developed a joint mobility to allow the various segments concerned travel in space and extensibility that allows the muscle to stretch easily. That said, I don't think I want you to become "jointed" as a dancer in the scale.
Here are some good reasons to make stretching (f. Madore 2012).
In view of these points I want to see how you're going to do stretching.
The opportunity to do some stretching before practice or the race there is a great discussion. Some authors (j. Weineck 2013) suggest doing 5 ' warm up before stretching. Sometimes for us runners is impossible, oddly enough, do a little jog in the start area workout or race. That's why I thought about 3-4 exercises of vascularization who just intended to prepare the body to stretching. It's run of the thrusts on the balls of your feet and knees towards your chest collection. Lately I added 3-4 sets of 30 "walk in place. The method of stretching that I propose is a Variant of Wharton's method. Is based on matching the breathing exercise: in the resting phase you breathe while undergoing elongation you exhale.
Before the race the runners more agitated, that "feel" emotionally the race must perform the exercises slowly with pretty deep breaths, while the quieter Council a dynamic that involves running a little more then a breathing more frequently. Each exercise is designed to never charge your back is repeated for 5-10 times. After the run I recommend stretching after the shower, in a dry, warm environment. While stretching the trigger slack is done standing, after running, relying always on the principle of respiration, is done on the ground, better on a mat. The perfect place to do the stretching of the pre race after race is apply the diaphragmatic breathing or abdominal. Who can't just breaths rather deeply, but never stay. This system ensures the blood supply to muscles with undeniable benefits.
(by Shashi Magar from fulviomassini.com)
TIPS FOR CHOOSING A SKI/SNOWBOARD HELMET
You enjoy skiing at full speed, pull the curves to the Max, tossed in the Woods and use the trees as if they were racing stakes, do jumps and acrobatics in the snow park? Very well.
Whether you are a skier oldschool, whether you're a freestyler or a freerider is definitely happen to make a close encounter with a rock, a tree, a plate of ice, another skier or why not, with a good skier. No doubt the helmet is what you need. The helmet is light, keeps you warm and more than anything else, it can save your life. Don't think about it too much and get one for next season.
Here are some tips to help you in choosing your helmet
1. How DID a helmet?
A ski helmet is designed to protect you against the obstacles you may encounter in the mountains: rocks, fallen trees, ice or other skier, ruinous. In addition a ski helmet possesses characteristics that are not climbing or helmets skateboards: ear protection, adjustable ventilation, protection from cold and compatibility with a ski mask.
✓ a helmet is generally composed of two layers
The outer layer consists of a hard surface that will protect your head against impact and sharp objects. The outer shell will propagate the bump on a large surface of the helmet, by reducing the risks.
The inner layer is made of expanded polystyrene, generally. Its aim is to absorb the impact and this helps avoid injuries. Inner layer acts like a mousse that you compress by absorbing the shock, while keeping your head.
✓ fabrication technology
The IN-Mold construction technology allows to merge, which is responsive, the inside with the outside. In this way the helmet will be formed from a single piece. The advantage is that this fabrication technology brings lightness to your helmet, creates a more efficient ventilation and allows you to better absorb the impact in the event of a collision.
With the Classic fusion instead the helmet consists of two pieces, the exterior and the Interior liner. The helmet exterior is made of hard plastic, while the internal part in polystyrene. The two parts are glued together. This technique is less expensive but the helmet is heavier and is harder to get an adjustable ventilation.
2. HOW to CHOOSE a helmet?
Find the right size: you have to measure the circumference of your head; for this operation you need to bring a tape sewn and you have to place it above the ears and above the eyebrows. You will get a circumference ranging from 52 to 65 cm. Once you have this information use it to choose a helmet that fits your size.
Several criteria influence the choice of a helmet.
Weight: if you choose a lightweight helmet, you will have a tendency to forget to have it worn and your movements will not be penalized by the weight.
Ventilation: adequate ventilation will allow you to adjust the temperature and to release perspiration. It is preferable for this choose helmets that have adjustable ventilation and allowing you to change the air flow while you're skiing.
Hygiene: many helmets have the internal protection and removable linings and thus washable.
Audio: some helmets have integrated audio headphone or have the ability to integrate your headphones.
Bearings and covers: certain models are sold with removable bearings to adjust your helmet and fit the shape of your head. These inserts can be removed and cleaned, especially not to underestimate visa status will be after a day of skiing.
 CALL US
